

Quilts Without Corners & Ten Degree
Click Button for Questions, Answers and Tips


Which wedge tool do I need, a nine degree or a ten degree wedge?
Only the Ten Degree will work with the Encore or Platinum Quilt Without Corners books.
Both wedges will work with the designs in the purple Quilts Without Corners. A nine degree wedge uses 40 pieces to make a circle and the ten degree uses 36 pieces. You can see more about the ten degree wedge on the tool page. We do not sell a nine degree wedge.
Are you using the Creative Grid's Ten Degree?
>You'll need this download of conversions.
Butterfly body graphic page 31:
The butterfly body is a folded technique that results in a slightly dimensional body. The shape you desire requires you to follow the instructions and make sure it is folded in half and inserted when you sew your two halves together. This graphic may help!! Note the fold, this was missing from the original graphic.

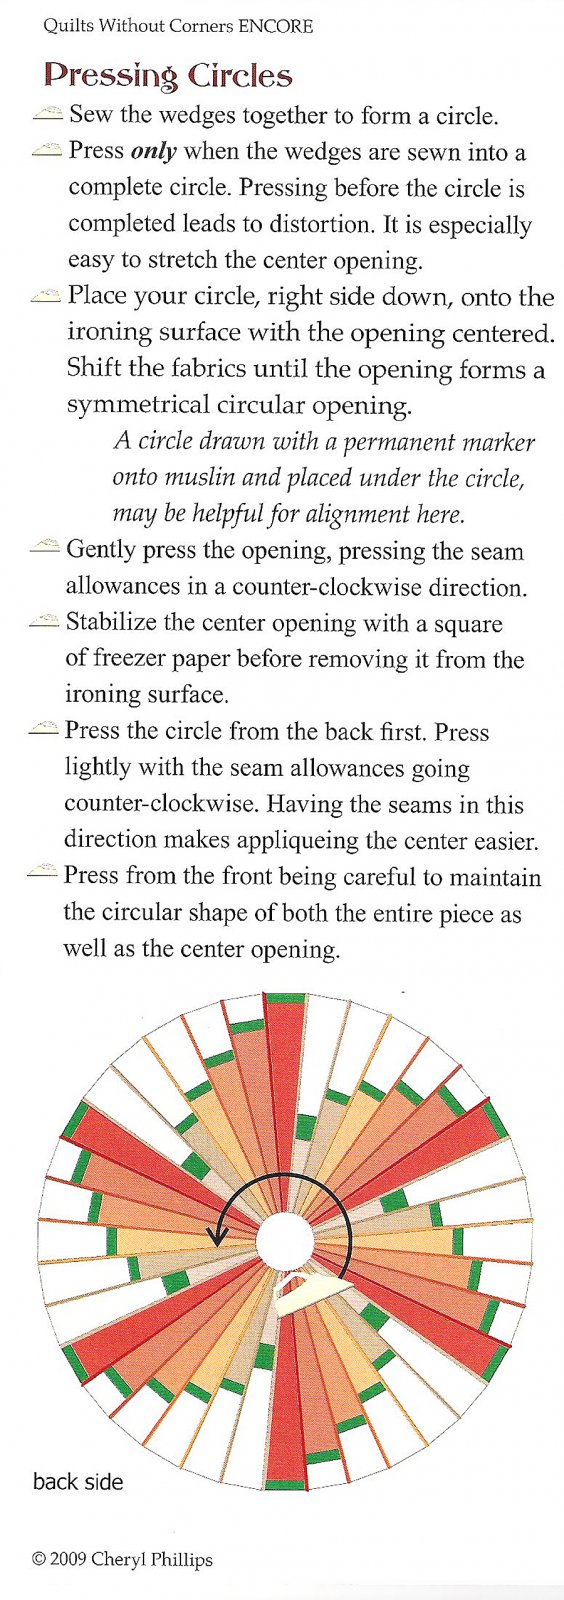
Ironing Tips
I do not press my circular quilts until all the wedges are sewn together. Here are some Pressing tips for circular quilts.
If you have the purple or old blue copy, when I wrote Quilts Without Corners Encore I made an interesting discovery. The ironing instructions from QWC have you press each 1/4 section, where I found it much easier to wait until you had the whole circle sewn BEFORE pressing. When you do press, press the center first and stabilize the opening before ironing the rest of the circle.
Can you miniaturize the Quilt Without Corners designs?
Many of the patterns in the Platinum Edition include smaller sizes variations. Making half size versions of typical patterns follows this formula: Subtract 1/2” from the strip width; Divide by 2; then Add 1/2” to the strip width.The problem with doing this for the circular quilts in Quilts Without Corners is the wedge tool. The center "hole" stays the same size, 5 1/2". The wedge always starts at the same point, 2 3/4". This means miniaturizing isn't as straightforward as typical "square" patterns.
To make "half" size versions (28” in diameter, not 25" as you would think) change each strip width as follows:
Only the Ten Degree will work with the Encore or Platinum Quilt Without Corners books.
Both wedges will work with the designs in the purple Quilts Without Corners. A nine degree wedge uses 40 pieces to make a circle and the ten degree uses 36 pieces. You can see more about the ten degree wedge on the tool page. We do not sell a nine degree wedge.
Are you using the Creative Grid's Ten Degree?
>You'll need this download of conversions.
Butterfly body graphic page 31:
The butterfly body is a folded technique that results in a slightly dimensional body. The shape you desire requires you to follow the instructions and make sure it is folded in half and inserted when you sew your two halves together. This graphic may help!! Note the fold, this was missing from the original graphic.
Ironing Tips
I do not press my circular quilts until all the wedges are sewn together. Here are some Pressing tips for circular quilts.
If you have the purple or old blue copy, when I wrote Quilts Without Corners Encore I made an interesting discovery. The ironing instructions from QWC have you press each 1/4 section, where I found it much easier to wait until you had the whole circle sewn BEFORE pressing. When you do press, press the center first and stabilize the opening before ironing the rest of the circle.
Can you miniaturize the Quilt Without Corners designs?
Many of the patterns in the Platinum Edition include smaller sizes variations. Making half size versions of typical patterns follows this formula: Subtract 1/2” from the strip width; Divide by 2; then Add 1/2” to the strip width.The problem with doing this for the circular quilts in Quilts Without Corners is the wedge tool. The center "hole" stays the same size, 5 1/2". The wedge always starts at the same point, 2 3/4". This means miniaturizing isn't as straightforward as typical "square" patterns.
To make "half" size versions (28” in diameter, not 25" as you would think) change each strip width as follows:
- Subtract 1/2” from the strip width.
- Divide by 2.
- Add 1/2” to the strip width.
- Then use the 14" line on the wedge tool as though it were the 25 1/4" (full tool).
- To calculate the specific placement lines, use the butterfly pattern on page 7 as an example: the 24" line is placed on the A/H line on first strip set. That is 1 1/4" from the top of the wedge. Divide this by 2 = 5/8". Subtract 5/8" from 14" =13 3/8" for the A/H line placement on the miniature. Strip set 2 would be 2 1/4" / 2= 1 1/8" from 14" = 12 7/8".
For the Butterfly pattern, I prefer a smaller center opening, so I use my Butterfly in the Round pattern. This pattern is simplified and uses a 12 degree wedge with a smaller center opening. See this pattern here.
For the Hopi Sun pattern I simplified some of the details and made a pattern renamed the Summer Solstice. It uses either the 10 degree mini or the regular 10 degree wedge. See this pattern here.
NOTE The Ten Degree MINI tool does not make a 50% reduction. It does make a 25" circle as explained in the first paragraph above.
How do I hang my 50” circular quilt?
Great question. There are several ways.
Framing Template for a 50" circle.
Framing Template for a 70" circle.
Design Grid:
Here's just what you need for planning your next Platinum Quilts Without Corners Project! The download includes 8 pages of designs.
Get out those colored pencils and ENJOY!!
Download Here
Platinum Quilts Without Corners LABELS
A great helper for organizing your Platinum Quilts Without Corners cutting and strip sets--Labels for all the patterns. Down load now for 9 helpful pages of labels.
Download Butterfly Reborn
Download Jazzy Jolt
Download Speedy Spiral
Download Chained Melody
Download Bargello
How do I trace the Jazzy Jolt 60 degree lines on my tool?
Check out page 38. I know the graphic is small but here's the precise measurements to get those lines in the right spot.
Put a ruler on the 60 degree line. come down 6 3/4 inches towards the wide end and draw a parallel line.
Move the ruler to the other side the 60 degree line and go 2 1/4 inches towards the narrow end draw another parallel line.
Adjust the line if needed to match your seam allowance.
How do I make the 25" Jazzy Jolt?
Download this helpful guide in creating a Mini Jazzy Jolt!
Correction for the Speedy Spiral Tree Skirt on page 20
When making the 60" Speedy Spiral folded edge pieces use the wide end of the Ten Degree Extension (page 63) instead of the 30" line. Your strip width should be 3 1/4" (not the 2 1/2" from the base size).
For the Hopi Sun pattern I simplified some of the details and made a pattern renamed the Summer Solstice. It uses either the 10 degree mini or the regular 10 degree wedge. See this pattern here.
NOTE The Ten Degree MINI tool does not make a 50% reduction. It does make a 25" circle as explained in the first paragraph above.
How do I hang my 50” circular quilt?
Great question. There are several ways.
- You can make a pocket on the back before adding the binding. Then add a half circle of cardboard to hold the circle edge smooth.
- You can add a bias tube on the back and insert a plastic tubing to hold the edge rigid.
- You can sew on a horizontal rod pocket about 1/3 of the way from the top. Insert a wooden slat in the pocket. Then use pins (used sewing machine needles work great) to hold up the top portion.
Framing Template for a 50" circle.
Framing Template for a 70" circle.
Design Grid:
Here's just what you need for planning your next Platinum Quilts Without Corners Project! The download includes 8 pages of designs.
Get out those colored pencils and ENJOY!!
Download Here
Platinum Quilts Without Corners LABELS
A great helper for organizing your Platinum Quilts Without Corners cutting and strip sets--Labels for all the patterns. Down load now for 9 helpful pages of labels.
Download Butterfly Reborn
Download Jazzy Jolt
Download Speedy Spiral
Download Chained Melody
Download Bargello
How do I trace the Jazzy Jolt 60 degree lines on my tool?
Check out page 38. I know the graphic is small but here's the precise measurements to get those lines in the right spot.
Put a ruler on the 60 degree line. come down 6 3/4 inches towards the wide end and draw a parallel line.
Move the ruler to the other side the 60 degree line and go 2 1/4 inches towards the narrow end draw another parallel line.
Adjust the line if needed to match your seam allowance.
How do I make the 25" Jazzy Jolt?
Download this helpful guide in creating a Mini Jazzy Jolt!
Correction for the Speedy Spiral Tree Skirt on page 20
When making the 60" Speedy Spiral folded edge pieces use the wide end of the Ten Degree Extension (page 63) instead of the 30" line. Your strip width should be 3 1/4" (not the 2 1/2" from the base size).


Download this for Prism Squared
Here's a helpful chart to supplement page 8 in the Prism Squared pattern
Here's a helpful chart to supplement page 8 in the Prism Squared pattern


Folded Card pattern Addendum:
In the paragraph Organizing Strips, the statement: Each group has two strips of each fabric, is incorrect. It should say: Each group will have eleven strips of fabric. Refer to the individual diagrams.
Download the Labels to help you keep your strips in order here!
Download the Applique instructions here!

The Phoenix, Pansy and Fantasy Flowers were made with the Cara "Gelato" gradation fabrics. Ask your fabric store to email us for distributor information.
Labels
They will help you keep your stripsets straight.
Phoenix labels Download
Bias Binding for your Phoenix and Eagle
(or other 50" circle quilts)
Questions about the NEW Phoenix Pattern
What is the difference between this and the Quilts Without Corners Encore book?
The pattern is only the Phoenix. The pattern itself is the same as in the book. The Eagle is now it's own pattern and has been completely redone to utilize stripset piecing. Click here to view the product details for the Eagle.
Circle Applique for your Ten Degree Projects

Eagle Labels
Download here
They will help you keep your stripsets straight.
CORRECTION
The cutting chart lists Two pieces 8 ½" x 17" of E
The correct fabric is C rather than E.
The page 11 diagram should look like this. (Fabric C rather than E)

Download here
They will help you keep your stripsets straight.
CORRECTION
The cutting chart lists Two pieces 8 ½" x 17" of E
The correct fabric is C rather than E.
The page 11 diagram should look like this. (Fabric C rather than E)

The Spicy Spiral table runner can be made with either the nine or ten degree wedge tool. The difference is only slight with this particular pattern. The nine degree wedge gives a slightly tighter curve where the ten gives a gentler curve to the design. Either one works fine and uses the same strip sets and directions.

How do I bind my Snappy Splendor runner when the two sides are totally different styles or colors?
Our solution is Invisible Binding. It shows on only one side of the project.
Download the free PDF for the full instructions!
Our solution is Invisible Binding. It shows on only one side of the project.
Download the free PDF for the full instructions!

The Stellar Medallion doesn't have an explanation of how to use the 2 yards of backing fabric to finish off the quilt. Here is the explanation of how to put those two yards together to make the backing. Please note this does say 3 yards but we opted for only 2 as you can turn the grain of the fabric to save on the extra yardage.
Download the backing instructions here!
Download the Grid for Stellar Medallion
Download the backing instructions here!
Download the Grid for Stellar Medallion

What fabric did you use for the Phoenix, Eagle and Flowers?
The Phoenix, Pansy and Fantasy Flowers were made with the Cara "Gelato" gradation fabrics. Ask your fabric store to email us for distributor information.
Phoenix Addendum:The template for the tail feather, found in the insert pullout section and shown on pages 24 & 26 will extend beyond the edge of the fabric. I suppose I was over zealous making sure you had enough fabric for this step. Know it will be trimmed to the correct size in the "Re-cut wedge" step.
Download the corrected Phoenix/Eagle label page.
The Z line referred to on Pages 24 & 26? This is the dashed yellow line on the template page. Sorry the label "Z" got dropped.
Pansy Addendum: Page 39, Color G-Two strips should be 130" x 19 1/2", not 9 1/2". Sorry for the error.
If you've unfortunately cut the fabric already, piece on another 9 1/2" strip to the Color G strip. Again, I'm sorry for the error. We assume the little digit "1" just got dropped after all the editing.
Fantasy Flower Addendum:
I have a problem with right/left on Page 31
10 degree graph paper
Mini 10 degree graph paper Download here.
Circle Applique for your Ten Degree Projects
The Phoenix, Pansy and Fantasy Flowers were made with the Cara "Gelato" gradation fabrics. Ask your fabric store to email us for distributor information.
Phoenix Addendum:The template for the tail feather, found in the insert pullout section and shown on pages 24 & 26 will extend beyond the edge of the fabric. I suppose I was over zealous making sure you had enough fabric for this step. Know it will be trimmed to the correct size in the "Re-cut wedge" step.
Download the corrected Phoenix/Eagle label page.
The Z line referred to on Pages 24 & 26? This is the dashed yellow line on the template page. Sorry the label "Z" got dropped.
Pansy Addendum: Page 39, Color G-Two strips should be 130" x 19 1/2", not 9 1/2". Sorry for the error.
If you've unfortunately cut the fabric already, piece on another 9 1/2" strip to the Color G strip. Again, I'm sorry for the error. We assume the little digit "1" just got dropped after all the editing.
Fantasy Flower Addendum:
I have a problem with right/left on Page 31
- Should say:Wedges Left1.
- Place the 2L marked wedge line on the B/G seam of Strip Set Left.
- Cut nine wedges. Label as 2L.
- Place the 3L marked wedge line on the B/G seam of Strip Set Left.
- Cut nine wedges. Label as 3L.
- Page 32 should say:Wedges Right 1. Place the 2R marked wedge line on the B/G seam of Strip Set Right.
- Cut nine wedges. Label as 2R. 2. Place the 3R marked wedge line on the B/G seam of Strip Set Right. Cut nine wedges. Label as 3R.
- I apologize for the errors. If you follow the wedge labeling it should be ok.
10 degree graph paper
Mini 10 degree graph paper Download here.
Circle Applique for your Ten Degree Projects

If you have chosen to purchase a Sew Easy Ten Degree or another brand rather than a Phillips Fiber Art Ten Degree you will need to know a few things. Not all of our patterns will work with these tools. Some have a curved base. The biggest issue is the placement of the angled lines. Note the 45 degree lines on a Phillips Fiber Art tool intersect at the 16" line. If your tool does not you will need to use a marker to move these lines. If you are struggling please double check you have the proper markings on your tool! These are critical!!